Thunder Road: Vendetta: My Reference

Game

  • Round
    • All players roll their 4 movement dice
    • First player also rolls the road die
    • First player rotates clockwise after each round
  • On your turn
    • Assign 1 die to an operable car
      • Place the die in the center of the dashboard
      • The number is how many spaces it moves
      • If you don’t have any available cars, assign it to the Coast space on a car you’ve already moved. Command cannot be used
    • Activate a command (Once per round)
      • Assign and activate a die to your command board
      • Commands
        • Airstrike – Any – Place your chopper in a free space and shoot with it
        • Nitro – 1-3 – add the value to your movement
        • Drift – 3-5 – pass through one space with a vehicle in without causing a slam
        • Repair – 6 – Remove 1 damage from 1 of your cars
    • Move that car
      • Car gains moves equal to the die assigned
      • A car moves into one of the 3 spaces in its front arc
      • Movement rules:
        • a car must move the full amount
        • can go through a space with a chopper
        • reveal hazards and resolve as the care moves
        • a car loses remaining moves when it takes damage
        • crashing into another car results in a Slam, place the moving car on top
          • Roll slam and direction die
          • Larger vehicle owner may ask for a reroll of both dice
          • Move affected vehicle as dice show
      • If all movement was on the road you may optionally now take another movement using the road die
        • same rules apply as a normal movement
      • Coast = move 1 space only, Road die can not be used
    • Shoot with that car
      • you can shoot vehicles, wrecks, but not choppers, in your front arc
      • if a wreck takes damange it is eliminated
      • you may shoot after resolving a slam
      • you may shoot your own cars
      • Roll the shooting die, hit is a match on size
      • owner of damaged car draws and resolces a damage effect

During Play

  • Moving off the front of map triggers next tile to appear (or they win)
  • vehicles on last tile are eliminated
  • if a player is out of the game, next tile becomes the last tile

Sagrada: My Reference

Setup

  • 1 private objective to each player (grey back)
  • 2 windows to each player – player picks 1 of 4 options
  • Allocate Favour tokens as pictured on window chosen
  • Display 3 tool cards
  • Display 3 Public objective cards

Game

  • 10 rounds going clockwise
    • roll dice – 2 x players +1 (e.g. 3 players: 7 dice)
    • Optionally select and place a die each going clockwise, then anticlockwise for an optional second dice
      • first player is first and last
      • last player is last and first
    • Optionally (and for each dice) use 1 tool card
    • 1 remaining dice goes on the round tracker

During the game

  • Dice placement rules
    • First die, against the edge
    • subsequent die must be adjacent (including diagonally)
    • Not violate colour/number restriction
    • Not be orthogonally adjacent to the same colour/number
  • Tools
    • cost favour tokens, 1 if you’re first, otherwise 2
  • Mistakes
    • If a mistake is found remove the die that’s breaking rules

Score Points From

  • Public objective cards
  • Private objective card
  • Favour token (1 point per token remaining)
  • lose 1 point for each open window
  • Tie break order:
    • most points from private objectives
    • most remaining favour tokens
    • reverse player order in final round

Everdell: My Reference

Game

  • For 4 seasons, Go clockwise, on your turn do 1 of 3 things:
    • Place a Worker on a Location
      • There are Exclusive and Shared locations (full circle vs open bottom)
      • 4 player spaces may not be used by the same player as the other one
      • Locations types:
        • Basic locations
        • Forest locations (cards)
        • Destination cards in your town (or open ones elsewhere, owner gets 1 point token from supply)
        • Events, first to visit claims it
        • Haven (discard 2 cards for 1 resource)
        • Journey (only in autumn, discard cards for points)
    • Play a Card
      • Play 1 Construction Or Critter into your city
        • From your hand or the Meadow (community hand)
        • Pay the cost, or free if pre-requisite already in your city
          • Mark construction as “occupied” when playing free critter
      • City has 15 space (5 x 3)
      • Unique cards = 1 copy per city (common cards can have multiple per city)
      • Card types
        • Tan Traveller – activates once when played
        • Green production – activates once when played and during Prepare for Season
        • Red Destination – activates when worker placed on it
        • Blue Governance – Grants bonuses
        • Purple Prosperity – Worth points and bonus points at end of game
    • Prepare for season (once there’s nothing else you want to do)
      • Take your workers back
      • Gain season bonuses as pictured on the tree
        • Spring +1 worker and activate green produciton cards
        • Summer +1 worker and Draw 2 cards from the Meadow
        • Autumn +2 workers and activate green produciton cards

During Play

  • Drawing cards is done from the Deck (unless specifically told to draw from Meadow)
  • Hand limit of 8 (strict – never exceed)
  • If a Meadow card is played replenish it immediately
  • If allowed to draw from the Meadow, draw all cards then replenish
  • If the deck runs out, shuffle the discard pile to form a new deck
  • At the end of the game, players who have passed can’t be given cards/resources

Score Points From

  • At end of game total points:
    • Base value of each card
    • Point tokens
    • Purple Prosperity bonuses
    • Journey Points (location on board, discard to place)
    • Events claimed
  • Ties: won by player with most events
  • Still Tied: won by player with most leftover resources

Tips

  • To note at the beginning:
    • Forest location tiles – which are good value?
    • Events on offer – what do they require? what is their reward?
    • What’s in the Meadow
  • Dungeon is great mid to end game for getting low value critters out of the city and reducing costs of new cards
  • Husband and Wife only take up 1 space in the city

Cry Havoc: My Reference

Game

  • 5 Rounds, 6 Phases
  • Each round:
    • Events
      • Reveal the next event token(s)
        • If a player passes a token during scoring, bump it along to be ontop of the next token
      • Update initiative
      • Refresh exhaused skills (turn them upgright)
    • Draw Cards
      • Draw 4, discard to 7
    • Actions
      • Following initiative track, each player gets 3 actions, 1 at a time, use action tracker to track
      • Actions Available:
        • Move
          • Discard 1+ cards, add up movement icons into points, spend points to move units
          • Movement stops upon encountering enemy/trog token (more units can move in to join though)
          • Next resolve:
            • Exploration tokens
            • Trog tokens
            • If uncontested, place control token
            • If contested, place battle token. until resolved:
              • no units may enter this region
              • place attacker unit on token to denote this
              • structures can not be built here
              • Unless noted, region may not be affected
              • Defender units may leave, however double enemey count must remain
        • Recruit
          • Discard 1+ cards, add up recruit icons into points, spend points to add units into headquarters
        • Build/Activate structure
          • Discard 1+ cards, add up building icons into points, spend points to add/activate structures
            • You can build and activate in the same action
            • A building can only be activated once per action
            • Can’t build in HQ or a battle region (with a battle token)
            • Can’t have >1 of the same type in a region
            • Unless noted, can’t activate buildings in a battle region
            • If control of region lost, structure remains, but it can’t be activated
        • Draw 2 tactics cards (from deck or any terrain deck), keep 1
        • Enable Scoring
          • Once of your cards has this as an action
    • Battle Resolution
      • For each battle token in order:
        • add a crystal to the region
        • transfer the units to the battle objectives (attacker first)
        • play tactics cards (attacker first, one at a time, pass is final)
          • terrain tactics can only used if the region matches
        • resolve the objectives
          • region control
            • winner gets 2VP and places control token
              • unless non-player Trog, in which case place a Trog Nest token
            • Defender wins draws
          • capture prisoners
            • winner takes 1 prisoner (from any objective, even from attrition)
          • attrition
            • for each unit placed, kill one enemy unit (from any objective) – back to reserve
            • score 1VP per enemy killed
        • place surviving winners back into region
        • retreat with surviving losing units
          • into an adjacent, non-battle, region under retreating players control
          • unless non-player Trog, in which case place a Trog Nest token into an adjacent uncrontrolled region
          • this may trigger a trog token, reveal it and place a battle token
          • if there’s nowhere to retreat, they go to Reserve
        • remove battle token
    • Prisoners
      • Score 1VP for each prisoner you have
      • Buy back prisoners for 2VP per prisoner (no limit), back to Reserve
    • Scoring – if enabled
      • The player who enabled scoring gains 1VP per region they control
      • All players scores 1VP per crystal in regions they control
      • If a player passes an event token during scoring, bump it along to be ontop of the next token
  • End of game
    • At the start of the 5th round the Event token is “Enable final scoring” – there is a Final Scoring token for this
    • Scoring can not be enabled by players in the 5th round

During Play

  • During your turn skills can be used before/after your action
    • turn the card 90 degrees to indicate it is exhausted
  • The Trogs are only controlled in a 4 player game
    • Trog tokens still spawn trogs and they’re available for use immediately
    • Trogs can move between regions with tunnels (prebuilt and structure token)
    • Losing a battle results in a normal player retreat, not trog exception
    • Trogs only score half total points (rounded up) for crystals in their control

Score Points From

  • 2VP – winning battles
  • 1VP – killing during battles
  • 1VP per prisoner per round
  • 1VP per controlled region per round if you activate scoring
  • 1VP per crystal in a controlled region per round

Tips

  • control regions, activate scoring, get points
  • boost crystal count by triggering battles
  • familiarise yourself with your skills and structures
  • take tactics cards that match territory where you are likely to contest

Dwellings of Eldervale: My Reference

Game

Worker placement with bonus actions on Recall

Go clockwise and on your turn either play a unit or regroup

  • Place a Unit (from your Ready Area, into the realm)
    • Gain 1 treasure token from the top of a stack
    • Placement Rules
      • First placement after Regroup – anywhere unoccupied (dwellings don’t count as occupied)
        • Warrior – tile can be occupied
      • Subsequent placement – adjacent and not occupied by yourself
        • Dragon – up to 2 tiles away
        • Wizard – anywhere unoccupied
    • Tile type has an effect
      • Mage Tower – spend 2 resources, get 3 magic cards, discard 1
      • Summoning Portal – spend cost, move unit to Ready Area
      • Mill – spend cost, convert a worker into a dwelling
        • Choose a worker in a realm, Pay cost on the tile, place roof on worker
        • Score 2VP per adjacent ruin (mill, dungeon, etc), Score 2VP per adjacent dwelling
        • Progress up Elemental Track as pictured on tile
      • Dungeon – expand map, get 2 adventure cards
        • Take top tile from tile stock, place it, populate treasure/monster
        • Take an adventure card from the market and progress up Elemental Track
        • Optionally take another adventure card (and progress up track), or discard one from the market
        • Repopulate adventure card market
      • Fortress – spend 2 resources, get 2 gold (Gold is a wild resource)
      • Oracle – pay cost to gain 1 adventure card or take 1 magic card
      • Lair – spawns a monster
  • Regroup
    • Retrieve units from tiles, onto cards to take actions, or into Ready Area
      • e.g. on starter card there are actions for Summon, Gather, and Dwell
    • Retrieve units from underworld into Ready Area (no card actions allowed)
    • Retrieve units from cards into Ready Area
    • If you have any, return Merceneries to supply

Game ends on 6th dwelling or realm tile stock depleted

During Play

  • Battles
    • Triggered by placing a unit in an occupied tile, tile action resolved first
    • Adjacent units may join (even those uninvolved initially)
    • Battle dice: 1 per unit/dwelling/adjacent dwelling, 2 for warrior, 3 for dragon
    • Spend swords for additional dice
    • Roll dice. Single highest dice wins (ties go to next highest dice etc). Everyone loses tie.
      • Winner goes up Glory track for a bonus (if monster beaten, can progress up Elemental track instead)
      • Loser units go to underworld, Gain 1 sword per unit
  • Adventure Cards, some special types:
    • Doorways – these give bonus if you’re highest on their corresponding Elemental track
    • Vaults – bonuses at end of game
    • Auras – attach to existing cards (as a free action), for a modifier
  • Monsters
    • Going adjacent to a monster causes them to Rush in
    • They have different abilities
    • Monsters don’t go to the underworld, simply set them aside when destroyed
    • You can dominate a monster, they become yours to control until destroyed
      • chain symbol indicates abilities that apply while being dominated
    • Some effects send monster back to lair, units go to underworld
  • Mercenaries
    • Pay to hire until Regroup as a free action (or with an orb to keep)
    • Minotaur – has monster Rush ability
    • Shapeshifter – use another units ability
  • Magic Cards
    • Obtained from Mage Tower
    • Hand limit of 7
    • Can be spent as resources
    • Spells – various effects, read the card, some have a cost
    • Quests – gain points during the game for completing goals
    • Prophecies – end of game points for completing goals
  • Free Actions
    • Treasure token – discard for pictured resource
    • Treasure token – place in a slot
    • Play a magic card
    • Hire a Mercenary
    • Spend an Orb
      • Choose a reward from Orb reward market
      • Slot Orb into Tableau
      • Slot Orb into Adventure card
      • Slot Orb to permenantly hire Mercenary
  • Treasure chest symbol (looks a bit like a pie) means any resource
  • Resource limit of 5 per type

Score Points From

  • During Game
    • Complete Quests (from magic cards, from Mage Tower)
    • Glory Track rewards
    • Orb bonuses
    • Tableau actions
    • Monster effects
  • End of Game
    • Unspent Orbs = 1VP
    • Complete Prophecies(from magic cards, from Mage Tower)
    • Elemental Track (1VP per rank), progressed up via:
      • adventure cards, from Dungeon exploring
      • creating dwelling, from Mill tile or Dwell action
    • Dwellings = 1VP per rank on corresponding Elemental track
    • Tableau cards = 1VP per rank on corresponding Elemental track
      • limit to scoring 3 cards per constructed dwelling (i.e. 4 dwellings = 12 cards)
    • Vault adventure cards

Tips

  • Different factions have different abilities – read the mat and take advantage!
  • Familiarise yourself with the adventure card market throughout the game
  • Elemental track is critical for end game scoring
    • You can only progress up 4 tracks
    • Pick tracks based on tiles you’re dwelling in and adventure cards taken
  • Get magic cards throughout, they’re useful and give end of game scoring
  • First placement:
    • look for tiles to dwell in with many adjacent ruins (2VP each) – don’t rush to dwell if not scoring
  • Early game
    • get units out (target summoning portal) – units get bonus actions on recall
    • if there are worthwhile adventure cards then go to the Dungeon
    • being able to get resources as part of recall is important, look for adventure cards to do this
  • Remember magic cards can be spent as resources

Tapestry: My Reference

Game

  • Go clockwise and on your turn either:
    • do the start of Age actions
    • pay to go up one of the tracks
  • Once you’ve done the start of Age 5 actions then your game is over

During Play

  • Actions affecting territory game in the middle
    • draw a territory tile from the bag to your reserve
    • play a territory tile from your reserve to the map
      • gain points for matching the edges of territory tiles
      • gain the resource pictured on the tile
    • place a tower on an adjacent territory to gain control of it
      • if opponent already there, knock theirs over
      • limit of 2 things per territory
      • roll the 2 dice for either resource or points
  • Actions affecting player city map
    • Place a building in city
      • Uses a building which reveals a Start of Age benefit
      • completing rows/columns gives points during Start of Age
      • completing districts (3×3 areas) gives a resource
    • Be first to reach a circle token on a track for a bonus structure to place in city
    • Complete bonus city objective to get bonus structure to place in city
    • Some tech cards give bonus structure to place in city
  • Actions for tracks
    • Progress up a track, and take benefit
    • Progress up a track, without taking benefit
  • Actions for technology
    • Take a tech card
    • Refresh the tech market and take a card
    • Upgrade a tech and take benefit

Gain Points From

  • Placing a map tile: points for matching the edges
  • Placing a tower on map: points from dice roll
  • Actions on tracks for scoring
    • Points for territory tiles in reserve
    • Points for controlled territories in map
    • Points for progress up a track
    • Points for tech cards owned
    • Points per tapestry card owned
    • Points per row/column in city
    • Points per building, of a specific type, in city
  • Start of Age bonuses
    • Points for tech cards owned
    • Points
    • Points per row/column in city
    • Points for controlled territories in map

Tips

  • Generally take resource when given a choice – more actions is more points
  • Get buildings into the city to reveal Start of Age benefits
    • Lots of points come from Start of Age – revealing the benefits is critical
    • 3 out of 4 tracks allow for 2 buildings to be placed within the first tier
      • 4 resources for 2 buildings per track (one building requires bonus payment)
    • Benefits:
      • First revealed building gets an extra resource
      • Second revealed building scores points
      • Third is another extra resource
      • Fourth is a resource and scoring points
      • Fifth is 10 points
  • Purple card from 3rd Arts action gives an extra bonus during Start of Age

Scythe: My Reference

Game

  • first turn: place your action token in a column and optionally take top action then optionally take bottom action
  • subsequent turns: move action token and repeat (i.e. can’t do same action twice in a row – unless you’re red star faction with Relentless ability)
  • Top Actions
    • Trade
      • Pay 1 coin to Gain 2 Resources or Gain 2 Popularities
      • If Armory built, Gain 1 Fighting power
    • Bolster
      • Pay 1 coin to Increase Fighting Power / Gain Combat Card
      • If Monument built, Gain 1 Popularity
    • Move/Gain
      • Move Units or Gain Coins
      • If Mine Built, use it
    • Produce
      • Pay cost shown (increases as you place workers) for workers in 2/3 (3/4 with Mill) territories to Produce on the terrain they’re in – 1 resource per worker:
        • Mountain – Metal
        • Farm – Food
        • Tundra – Oil
        • Forest – Wood
        • Village – Worker
      • If Mill built, produce there too
  • Bottom Actions
    • Upgrade – Pay Oil to Upgrade = Move cube from the top to bottom(, Gain Coin(s))
    • Deploy – Pay Iron to Deploy any Mech(, Gain Coin(s)) – mech appears in a hex with a worker
    • Build – Pay wood to Build a Structure(, Gain Coin(s)) – building appears in a hex with a worker, 1 structure limit per hex
    • Enlist – Pay food to Enlist (move one token brom bottom action area to the faction mat)(, Gain Coin(s))
      • Gets 1 time bonus from faction mat, ongoing bonus when neighbours do corresponding actions
  • Placement of 6th star immediately ends the game

During Play

  • Place stars for (10 options, 6th placement ends the game):
    • All 6 upgrades
    • All 4 mechs
    • All 4 structures
    • All 4 recruits
    • All 8 workers
    • 1 completed objective
    • Win combat (first time)
    • Win combat (second time)
    • reach 18 popularity
    • reach 16 power
  • Enlisted bonuses
    • Upgrade – gain 1 fighting power and pay attention if players on left/right upgrade
    • Deploy – gain 1 coin and pay attention if players on left/right deploy
    • Build – gain 1 popularity and pay attention if players on left/right build
    • Enlist – gain 1 combat card and attention if players on left/right enlist
  • Deployed mech bonuses (apply to mechs and character)
    • All: Riverwalk – travel across rivers to certain terrains
    • All: Speed – +1hex per movement
    • Underpass – move between controlled mountain and any tunnel
    • Disarm – before combat on a territory with a tunnel, opponent gets -2
    • Township – move between controlled villages or the factory
    • Peoples army – play an extra combat card if a worker is present
    • Seaworthy – move to/from lakes. Retreat into adjacent lakes
    • Artillery – before compat, pay 1 power for opponent to lose 2 power
    • Wayfare – move to any non-opponent home base
    • Scout – Before combat steal 1 combat card from opponent
    • Submerge – enter and move between lakes
    • Camaraderie – don’t lose popularity forcing opponent worker retreat
  • Faction bonuses
    • Dominate – no limit to objectives/combat stars
    • Relentless – can repeat same action as previous turn
    • Swim – workers may cross rivers
    • coercion – spend a combat card as a resource (once per turn)
    • Meander – pick up to 2 options per encounter card
  • Movement
    • Standard move action: move 2 different units 1 territory each
    • All units may carry any/all resources with them as they move
    • Mechs can pickup/drop off workers too
    • Movement ends for combat (including workers simply retreating), encounter, factory card
  • Combat
    • Select power value
    • Optionally add 1 card per unit involved
    • Winner gets territory (and resources if any) and places star
    • Winner loses 1 popularity for each worker forced into retreat (i.e. they were attacker)
    • Loser retreats units to home base and gains 1 combat card if they revealed more than 0
  • Encounters
    • Move character into hex with encounter token, take a card, choose a bonus
  • Factory
    • Center hex is worth 3 hex at end game scoring
    • If character ends turn in factory take a factory bonus card
  • Factory bonus card actions
    • Top action (one of):
      • Pay 1 popularity, Gain 1 Enlist or 1 Upgrade
      • Pay 2 coin, Gain 1 Upgrade and 1 Popularity
      • etc
    • Bottom action (all have):
      • Move 1 unit twice within the same move action (move 3 spaces if speed mech ability unlocked)

Gain Points From

  • Coins in hand
  • Structure bonus tile
  • Ranking on popularity track affects coins gained per count of:
    • Stars placed – 3/4/5 coins
    • Territories controlled – 2/3/4 coins
    • Per 2 resources – 1/2/3 coins

Tips

  • Start of game
    • familiarise yourself with your factions mech abilities
    • familiarise yourself with your factions bottom action costs/rewards (coins)
    • familiarise yourself with your factions special ability
    • familiarise yourself with the Structure bonus tile
  • Try to get both top and bottom actions as frequently as possible
  • Popularity is important for the multiplier – gain it from
    • Trade (top action)
    • Place monument to reveal gain popularity icon
    • Enlist from the Build action to reveal gain popluarity from neighbour bonus
  • Focus on points: popularity multiplier and winning stars/controlling territories
  • Basic strategy: spread out gaining territories while working towards stars
  • Lots of ways to get stars, choose which ones to ignore and which to focus on
    • Some are quicker than others (e.g. 4 mechs vs 6 upgrades)
  • Upgrade(s) can make it so that the top actions Trade/Produce can pay for their bottom actions all in the same turn
  • Build structures to keep control of a territory
  • Leave mechs defending workers/territory/resources
  • Get first 3 workers out early (target village first turn)
  • Combat cards and power track are only good for combat, no end game bonus
  • The same unit can’t use more than 1 move action per round (Speed mech bonus increases range, factory card gives double move action, double move +speed = 3 hex)
  • Add multiple units into combat to play multiple combat cards
  • Factory card facilitates consecutive movements
  • In combat, when forfeiting, playing 0 points, but 1 combat card will earn you a new combat card and lose no points

Rise & Fall: My Reference

Game

  • setup
    • builds a map – pay attention as starting location choice is critical
    • place 1 city, 1 ship, 1 nomad
  • turn
    • everyone place a card face down, reveal it simultaneously
    • go round in turn order doing an action for each piece on the board that matches your card
  • end of turn
    • Decline – dicard a card for each trophy won during the round
    • Decline buy back – cost shown on Trophy Board – limit of 1 buy back per round
    • if you’re out of cards pick up your dicard pile, advance first player token

During Play

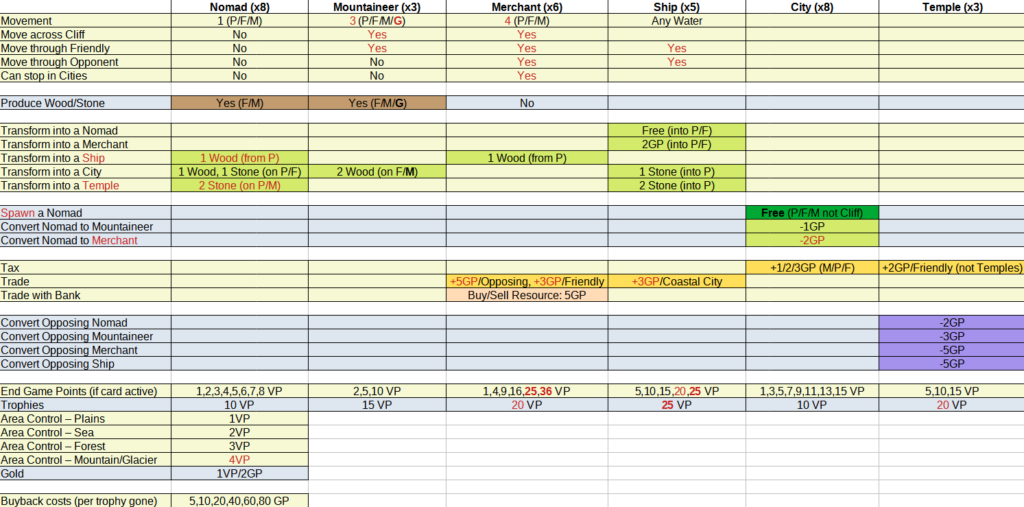
NomadMountaineerMerchantShipCityTemple
Movement134any water
move across iceNoYesNo
move across cliffNoYesYes
move through enemiesNoNoYes
can stop in citiesNoNoYes
Produce wood/stoneYesYes (including glacier)No
Construct a city1 wood, 1 Stone2 Wood (not in plains)1 Stone
Construct a temple2 Stone2 Stone
Construct a ship1 Wood1 Wood
Become a NomadFree
Become a Merchant2GP
Spawn a nomadFree
Convert nomad to Merchant-2GP
Convert nomad to Mountaineer-1GP
Tax itself+1/2/3GP
Trade+3GP/coastal city+5GP/enemy, +3GP friendly
Trade with BankBuy/Sell for 5GP
Convert enemy Nomad-2GP
Convert enemy Mountaineer-3GP
Convert enemy Merchant-5GP
Convert enemy Ship-5GP
Tax friendly neighbours+2GP each
  • limit of 5 wood, 5 stone per player
  • Get a trophy for placing all units of a particular type
    • Triggers a 1 card Decline at end of round from each player
  • As your unit types join/leave the game add/remove their corresponding card to/from your hand

Gain Points From

  • Area control (most units in an area – draws are lost)
    • Plains – 1VP
    • Sea – 2VP
    • Forest – 3VP
    • Mountain – 4VP (includes glacier in area)
  • Each Active card (not reserve/decline)
    • Score for number of pieces in play
  • 1VP for each 2GP
  • Trophies

Tips

  • Keep enough money to buy cards out of decline – 2 trophies in 1 round can wipe a player out of the game
    • Starting position tips
    • spread out
    • aim for wood/stone
    • avoid neighbours (avoid being fenced in)
    • look for areas to monopolise that others won’t get to easily (on edges surrounded by cliffs/glaciers)
  • Early on quick expansion: nomads to cities to spawn nomads
    • has risk of no money to buy cards out of decline
  • City spawning nomad is the main way to add pieces to the board (only other way is temple converting enemy)
  • Leave spawned nomads by their spawning city to immediately convert to Merchant/Mountaineer
  • Mountaineer not that useful – only needed for traversing ice/ice mining – only converts out to a city
  • To spread out across water:
    • coastal city -> spawn nomad -> convert to ship -> travel away -> create coastal city/temple
  • To spread out across land:
    • coastal city -> spawn nomad -> convert to merchant -> travel away -> convert to ship -> optional travel away -> create coastal city/temple
  • Get a merchant in a nest of cities for big trade income
  • Get multiple ships in water with many coastal cities for big trade income
  • Early focus should be on getting cities out

Terra Mystica: My Reference

Game

  • start of each game, and after passing each round, choose a bonus scroll
  • unused scrolls get 1 coin added at the start of each round
  • Get income from hand palm up symbol (most are covered by buildings)
  • Play actions until you can’t then pass – passing order becomes play order of next round
    • transform and build (indirectly adjacent – i.e. connected with shipping or other faction ability)
    • upgrade a structure
      • when building or upgrading: other players directly adjacent tiles (includes bridges) trigger purple power income equal to their tile value. Owner has to lose vp equal to their purple power income minus one (e.g. gain 4 purple power, lose 3 VP)
      • trading house upgrade cost is cheaper if directly adjacent to another player
    • advance shipping track
    • upgrade spade exchange rate
    • send a priest to priest track
      • priest track can grant purple power
    • purple power market
    • use and yellow/orange hex action
  • Free action
    • spend purple power for a priest, worker or coin
    • downgrade a priest to worker and/or worker to coin

During Play

  • get a town for 4 directly adjacent structures with a value of at least 7
    • town can be build with just 3 tiles if one of them is the sanctuary
    • town gives a key to lock in top spot of a priest track
    • bridges can be used for directly connecting over water
      • this is their only use
      • they’re only available from the purple power market
  • get a favour tile for building a temple or sanctuary
  • end of each round gives a bonus powered by the priest track

Gain Points From

  • each round has a bonus scoring option
  • bonus for forming a town
  • advancing the shipping track
  • advancing the spade exchange rate track
  • end game bonus for largest count of connected tiles (indirectly adjacent)
  • end game bonus for ranking on priest tracks

Tips

  • at start of game digest your factions dig track and the good spots on the board to start in – starting areas are important
    • you want neighbouring tiles that are cheap to convert
    • you want other players nearby for purple power bonuses and cheaper upgrades
    • edges can be dangerous as you can be fenced in
    • overpopulation can be dangerous as you can be fenced in
  • at start of game digest which rounds give which scoring bonuses, in particular:
    • 5 points for towns
    • 5 points for stronghold/sanctuary
    • 3 points for trading house
  • at start of game digest which rounds give which end of round priest track bonuses, in particluar:
    • 1 coin for each brown
    • 1 worker for 2 red/2 silver
  • Purple power is important
    • sacrifice 1 purple power in bowl 2, to move a purple power from bowl 2 to 3
    • reduce purple power early on to use the market asap
    • with fewer purple power tokens they move around the bowls quicker
    • the purple power market is powerful
    • being first in the player order gives first access to the purple power market
  • focus on getting quantity of buildings out early on – uncovered buildings are income, this is the engine
  • stronghold upgrade early can be worthwhile depending on the faction
  • target the priest track in the second half of the game – many points live there
  • some favour tiles have added value early on:
    • give points for building or points at end of round for buildings
    • action space to advance priest track
    • reduce town power requirement to 6 (lot’s of points in towns, can be a strategy to try to build many)
    • extra income (power, worker, coin)

Castles of Burgundy: My Reference

Game

  • roll 2 dice (3 if you’re the lead player)
  • using number on dice to do 2 actions
    • buy a tile from the corresponding market into your holding area
    • place a tile from your holding area onto a corresponding slot on your board
    • sell corresponding goods from your crate area (gain 1 silver and each worth 4 at the end)
    • without needing corresponding: gain 2 workers (can be used to +/- 1 from your action dice)
  • Free action during your turn (max once per round)
    • spend 2 silver to buy a tile from the black market in the middle

During Play

When playing tiles onto your board you gain bonuses:

  • mines – give you silver at the end of each round – target these early on
  • tiles for extra actions from:
    • have an extra action (pretend you have another dice of any number) – castle
    • have an extra action using the white dice number – white castle
    • gain extra tiles from market – carpenter, church, market
    • place a tile on your board – town hall
  • monastries
    • keep an eye on which bonuses are on offer
  • farms
    • keep an eye on which animals have been/gone
  • ships
    • get you goods and advance up the shipping (turn order) track
  • other tiles
    • get 2 silver – bank
    • get 4 workers – boarding house
    • get 4 VP – watchtower
    • sell 2 type of good – warehouse

Gain Points From

  • completing areas – the earlier the era for more points
  • being the first/second to complete all areas of a colour gets bonus chit
  • being the first/second to link the 3 castles around the edges of the board gets a bonus chit
  • sold goods are worth 4 points each
  • building a farmland of similar animals adds up (1 point per matching animal, each time you add/expand the farm)

Tips

  • mines have their own colour on the board
  • don’t mix up yellow monastry and beige building
  • roll the white dice too if you’re first player
  • In a 4 player game the goods don’t stay in the market area for long
  • at the start of each era read the power ups on offer from the monastry tiles in the market
    some are really good (1 silver for 2 workers)
  • some work well with others (2 workers for 1 building)
  • get some for bonus scoring at the end
  • 2 of the same building types (beige) can’t be in the same area as eachother (e.g. 2 banks)
    Inns expand an area by a bonus 1 – best used within bigger areas for bigger bonuses
  • Look for shipping opportunities to get goods that stack so that 1 selling action gets multiple tiles scoring
  • Look to sell goods that match covered bonus tiles on the trade route (sell a stack to cover multiple bonus tiles – they unstack)
  • Try to place tiles in a way that there are a range of numbers and colours connecting to keep options open